|
Helmel has integrated
the Renishaw UCC2 controller into it's full DCC
style CMM product line. By doing this, we expand our
capabilities to include analog scanning probes to
compliment the touch trigger probes. The UCC2 is
compatible with the I++ / DME
Initiative that brings common platform support for a
wide variety of CMMs and manufacturers.
This system is targeted toward reverse engineering
and to provide enhanced inspection tools by
capturing larger data point clouds for a more
accurate inspection process. Helmel's own Geomet
Universal CMM Software has evolved to include the
full power of the UCC2 with the ease Geomet is
famous for.
Scanning Technology
The UCC2 has native support for the SP25 scanning
family. Scanning is best controlled, not by the host
software such as Geomet, but in a closed loop
between the scanning head feedback and the motion
controller. The UCC2
has its own proprietary controller system that
responds to the feedback from the scanning head. The
change in stylus contact with the surface being
scanned is fed back into the controller in real-time
and from that information, the motion controller
guides the CMM along a path that keeps the probe in
contact with the anticipated surface.
This sampling is done at such a high rate that you
can scan in excess of 100 mm per second on uniform
surfaces. The scan speed is adjusted downward to
accommodate uneven surfaces that required a tighter
motion control to follow it. While this motion
control sampling is happening, the UCC2 is also
capturing and sampling data points at predetermined
pitch values. On uniform surfaces, it is common to
capture thousands of data points in a few seconds.
With this increase in data point capturing you are
assured of a better representation of the surface
and its nuances to form.

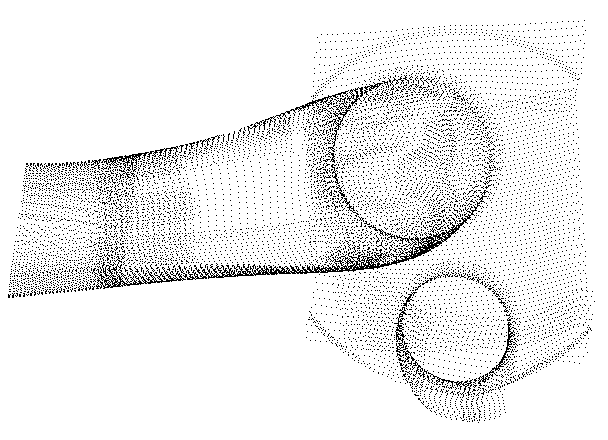
The example above is a port on an engine head that
required the UCC2 to scan in patches as the head is
rotated within the CMM on a special U/V Axis Table
and under the control of Geomet.
The benefits of this setup is that the data points
remain stable in the Part Coordinate System, which
articulates with the change to the position of the
U/V Table. To better
understand the benefits of the U/V Rotary Axis
Table, please
click here.
The data point clouds
shown above is exported into a CAD-CAM system for
processing directly into tool paths for replication.
Inspection Benefits
Not all applications require a concentration of data
points as illustrated above. However, capturing data
clouds on prismatic features provides you with a
better understanding of what the feature looks like.
For example, taking 10 points on a basic 4".00
diameter circle producing a fairly reliable size and
position, but lacks the data point concentration to
determine it's circularity.
In today's world, it is no longer acceptable to use
minimum data points to determine a feature.
Engineers are now asking where the form deviates and
how it can affect product operations. Take for
example a cylinder that houses a pressed bearing. If
the cylinder had a typical triangular internal
shape, that force applied from the three fluted
surfaces onto the pressed bearing will also deform
the bearing and reduce its service life.
However, scanning the internal surface of the
cylinder with a helix scan that captures data points
all along the surface will then show the form shape
when passed into a form analyzer such as the Circle
Profile Tool in Geomet.
Geomet and the UCC2
The power of the UCC2 can only be accessed by
efficient and user friendly CMM host software.
Geomet has carved out a niche in the inspection
world as a user friendly and powerful software
package. It only became natural that Geomet would
apply its basic concepts and experience to accessing these new and
powerful UCC2 tools.
Using the
Circle Generator as an example, we have expanded
its use by adding a simple check box to the
generator that switches from touch probe operations
to the scanning process. The benefits to the user
are immense by not having to learning new scanning
tools for every feature.
There are special scanning tools that perform
contour following on open and closed surfaces. These
deliver data cloud sets and
Cardinal Splines for use in model comparisons
and reverse engineering. |


